去年就一直很想去的地方
但是正式開放是今年7/1
我也算去的不晚
不過
滿失望的就是
好短的天空步道
有玻璃簍空的約40米吧
不高也不恐怖
也不怎美就是
有種 來尿尿的感覺
因為有提供廁所


這個不會吵也不會叫…. 所以請安靜的看就好….
去年就一直很想去的地方
但是正式開放是今年7/1
我也算去的不晚
不過
滿失望的就是
好短的天空步道
有玻璃簍空的約40米吧
不高也不恐怖
也不怎美就是
有種 來尿尿的感覺
因為有提供廁所
今天是最後一塊菲力
自從我買了舒肥幾後就時常煎牛排
不過我應該是為了煎牛排而買舒肥機
當初是上網查如何煎牛排
意外看到這種低溫料理
說是 白癡料理機… 完全不會失敗
其實應該是說 比較好控制
下次有空再來寫個 全記錄
今天的午餐 牛排是舒肥後再煎
牛排比較黑的原因是我用檯燈
左邊打光
今天這個蝦 滿意 Costco 買的…
叫什 大尾科X帶尾蝦仁….

這是今天的晚餐
都煮好時發現 太多了
有雞胸肉 / 蝦 / 秋葵 / 花椰菜 / 高麗菜 / 小黃瓜
我好像每次弄都會搞太多…. 還好 除了日式燒烤醬外 沒加半滴油

User 端發生的問題
機器: Win7 x86 台水公務機有加AD…. 所以我無權…
因為 : GIS 有問題, 移除 IE11 重裝失敗, 再移除 IE10 , 只剩 IE8
重裝 IE11 TW_ZH 失敗
重裝 IE10 TW_ZH 失敗
重裝 IE9 TW_ZH 失敗
重裝 IE9 EN, IE10 EN, IE11 EN 都失敗
開本機 Administrator 安裝也失敗
然後…. Google了好久… 約花四天… 每週去一天…
然後 IE9 裝好…
再繼續查 IE 11 失敗問題…
原因: C:\Users\使用者名\AppData\Local\Temp 權限被鎖
是否為 AD 問題, 或是因我移除 IE 而發生,
或是該軟體安裝時用 Administrator 裝,
或是當初安裝的帳號已砍…
查看: c:\windows\ IE11_main.log
00:39.734: INFO: Launched package installation: C:\Windows\System32\dism.exe /online /add-package /packagepath:C:\Windows\TEMP\IE1976E.tmp\IE10-neutral.Downloaded.cab /quiet /norestart
00:39.843: INFO: Process exit code 0x00000005 (5) [Access is denied. ]
00:39.859: ERROR: Neutral package installation failed (exit code = 0x00000005 (5)).
參考網址: https://jingyangli.wordpress.com/2015/08/18/ie11-install-problem-neutral-package-installation-failed-exit-code-0x00003715-14101-and-setup-exit-code-0x00009c59-40025/
原文沒有用, 還是會有寫入問題, 所以 我暫時改了 Temp 目錄
處理:
1. 用本機 Administrator 登入
2. 開 Dos mode
3. 建立符號連結(Dos Command): mklink /D c:\Windows\SysNative c:\Windows\system32
4. 執行 IE11的安裝程式 , 開出畫面後先不要按 安裝 也不要關掉它
5. 到目錄 C:\Windows\temp 找到最新的 .temp 目錄 如: IE1CF28.tmp(或用日期找)
6. 將該目錄複製成 IE1CF18.tmp (亂取沒差, 但為了配合以下指令, 就跟我改一樣)
7. Dos Command: set TEMP=c:\temp (這只是臨時的, 該目錄請先建好)
8. Dos Command: set TMP=c:\temp
9. 在 DOS下跑完以下:要確定跑完都沒錯誤
dism.exe /online /add-package /packagepath:C:\Windows\temp\IE1CF18.tmp\IE11-neutral.Extracted.cab /quiet /norestart
dism.exe /online /add-package /packagepath:C:\Windows\temp\IE1CF18.tmp\IE11-neutral.Downloaded.cab /quiet /norestart
10. 回到 IE11的安裝程式,按下 安裝
11. 重開機, 看 IE 是否升到 11 版
以下為 IE11 錯誤紀錄檔
如題 網路上看到的 怕忘記 留存
請將以下指令存成 .bat
執行後 重開機
REG EXPORT “HKCU\Software\Classes\Local Settings\Software\Microsoft\Windows\CurrentVersion\TrayNotify” TrayNotify.reg
REG DELETE “HKCU\Software\Classes\Local Settings\Software\Microsoft\Windows\CurrentVersion\TrayNotify” /v PastIconsStream /f
REG DELETE “HKCU\Software\Classes\Local Settings\Software\Microsoft\Windows\CurrentVersion\TrayNotify” /v IconStreams /f
taskkill /F /IM explorer.exe
explorer.exe
所做的動作就是
1. 將註冊檔保存
2. 刪除註冊檔
3. 砍了 IE
4. 重開 IE
今晚夜騎剛好看到的 火龍果花
其實 它 不是 曇花….
不過跟曇花一樣 都只開一晚
因此很少看到
所以拿起手電筒打光拍照
只是廟旁邊坐的兩三個人
應該覺得 沒看過火龍果花嗎?
就是沒看過啊 哈哈


|
種類
|
指令
|
||||||||||||||
|
基本類:
|
進入管理者模式:
enable
進入組態模式:
conf t
設定機器名稱
hostname 名稱
備份組態檔:
copy run start
IOS 重新開機:
reload
中斷搜尋:
ctrl + shift + 6
檢查/追蹤路由
traceroute IP
設定登入通知訊息
en
conf t
banner motd “……….” 只要登入路由器就顯示通知
banner login “……….” 當有密碼登入路由器之前就顯示通知
banner exec “……….” 當登入使用者模式時會顯示通知
關閉網路介面卡 //page 5-4
int f0/0
shutdown
查詢路由表: //page 5-2
show ip route (ip 位址)
在網路介面上註解:
en
conf t
int fa0/0
description this is fa0/0(註解)
建立本地帳號:
en
conf t
username ccna1 secret cisco1(使用 password 為明碼模式)
//在 console 使用本地帳號登入
line console 0
login local //啟用
//在 telnet 使用本地帳號登入
line vty 0 15
login local //啟用
※當啟用本地帳號驗証,就不會使用 console 及 vty 的密碼
|
||||||||||||||
|
檢視類:
|
查看 running 組態檔內容:
show run(runing-config)
查看 startup 組態檔內容:
show start(startup-config)
查看 flash(存放 IOS)內容:
show flash
查詢路由資訊:
show ip route
查詢網路介面:
show ip int brief
查詢登入狀況:
show users
查詢路由器軟體資訊:
show version
查看網卡狀態/MAC位址/雙工模式/速度:
show int fa0/1
查詢/清空 MAC Table:
show mac-address-table 查詢
clear mac-address-table 清空
檢查/追蹤路由:
traceroute IP
查看 ARP 暫存資料:
show arp
顯示啟動開始執行過的指令:
show history
設定儲存歷史指令的大小
terminal history size
查詢 Switch Vlan:
show vlan
查看vlan
show vlan brief
show vlan summary
show vlan vlan 20
show interface vlan 20
show interface trunk
show interface fa0/1 switchport
查看 RIP
show ip protocols
show ip route (ip 位址)
查看 ospf
show ip protocols
show ip ospf neighbor
show ip ospf database
show ip ospf interface serial 0/0/0
查詢 TRUNK 協定
show int trunk
查詢路由 AD 值:
conf t
show ip route 172.30.100.0
資訊中的 Distance 即表示 AD值
查詢 CDP 鄰居表
show cdp neighbors
查詢目前正在運作的 EIGRP 介面
en
show ip eigrp int
查詢 EIGRP 鄰居
en
show ip eigrp neighbors
|
||||||||||||||
|
密碼類:
|
密碼加密:
service password-encryption
設定 enable 密碼:
enable secret 密碼
enable password 密碼
設定console密碼:
line console 0 //設定 console 閒置時間
password 密碼
login //啟動密碼
exit
設定telnet密碼:
line vty 0 15
password 密碼
history size 35 (history buffer)
exec time-out 60(六十秒不用就斷線)
login //啟動密碼
exit
使用ACL 控制VTY連線:
access list 11 permit host 192.168.1.1
line vty 0 4
access-class 11 in
設定其它密碼加密:
service password-encryption
Router IOS 復原:
詳見書本 4-52 頁
Router 密碼復原:
詳見書本 4-55頁
使用SSH 連線:
username 使用者名稱 password 密碼
ip domain-name (domain的名稱)
crypto key generate rsa
ip ssh version 2
line vty 0 15
login local
transport input telnet ssh (只允許telnet 連線到vty)
加密傳送
設定鎖的名稱
Router1(config)#key chain ORA
設定開鎖的第一把鑰匙
Router1(config-keychain)#key 1
Router1(config-keychain-key)#key-string rocket
設定可以開鎖的時間
Router1(config-keychain-key)#accept-lifetime 00:00:00 Jan 1 1993 00:15:00 Nov 1 2006
Router1(config-keychain-key)#send-lifetime 00:00:00 Jan 1 1993 00:00:00 Nov 1 2006
設定開鎖的第二把鑰匙
Router1(config-keychain-key)#key 2
Router1(config-keychain-key)#key-string martian
設定那個介面要使用
Router1(config)#interface Serial0/1
Router1(config-if)#ip authentication mode eigrp 55 md5
Router1(config-if)#ip authentication key-chain eigrp 55 ORA
|
||||||||||||||
|
switch類:
|
查詢 Switch Vlan:
show vlan
修改交換器雙工模式及速度:
en
conf t
int fa0/3
duplex auto
duplex full
duplex half
speed auto
speed 10
speed 100
設定 switch IP 及密碼:
en
conf t
int vlan 1
ip addr 192.168.10.10 255.255.255.0
exit
ip default-gateway 192.168.10.1
enable secret 密碼(enable password 密碼 未加密的設定)
line vty 0 15
password 密碼
login
exit
取消 switch line vty 密碼
conf t
no password
no login
啟動 L3 Switch 繞送功能:
conf t
ip routing
將L3交換器變成路由器的方法:
int f0/6
no switch port
ip addr 192.168.200.1 255.255.255.0
no shut
end
啟動vlan
vlan 20
name 名稱
指定 Port 到 Vlan
int f0/1
switchport access vlan 10
int f0/2
switchport access vlan 20
啟動trunk
conf t
interface fa0/1
switchport mode trunk
查詢 TRUNK 協定
en
show int trunk
取消 vlan
interface fa0/18
no switchport access vlan
刪除 vlan
no vlan 20
delete flash:vlan.dat
查看vlan
show vlan brief
show vlan summary
show vlan vlan 20
show interface vlan 20
show interface trunk
show interface fa0/1 switchport
啟動port security
switchport mode access(一定要access mode)
switchport port-security
switchport port-security mac-address 0000.0c9b.d2d8
switchport port-security mac-address sticky
switchport port-security violation shutdown
show port-security int fa0/24
設定 Switch 連接埠模式 //page 10-43
conf t
int f0/1
switchport mode access //設定為存取模式
int f0/2
switchport mode trunk //設定為主幹模式
修改原生Vlan(Native Vlan) //page 10-50
conf t
inf f0/1
switchport trunk native vlan 10
設定限制使用主幹(Trunk)連線 //page 10-53
conf t
int f0/1
switchport trunk allow vlan 10 //只允許 Vlan 10 使用 Trunk
switchport trunk allow vlan add vlan 20 //將 Vlan 20 加入用 Trunk
switchport trunk allow vlan ? //指令查詢
修改自動協商(DTP dynamic trunk protocol)參數 //page 10-45
conf t
int f0/1 //下列指令四選一
switchport mode access
switchport mode trunk
switchport mode dynamic auto
switchport mode dynamic desirable
停止自動協商(DTP) //page 10-47
conf t
int f0/1
switchport nonegotiate //如果先前是設定 dynamic 不可停止,需變更
查詢 Switch Mac Table //page 11-20
en
show mac address-table
清除 Switch Mac Table //page 11-20
en
clear mac-address-table
查詢 Switch Secure MAC Table //page 11-20
en
show port-security address
清空 Switch Secure MAC Table //page 11-20
en
clear port-security all
設定靜態安全 MAC //page 11-23
conf t
int f0/1
switchport port-security mac-address 0002.166B.69C8
查詢介面的 port-security 狀態 //page 11-26
en
show port-security int f0/1
設定介面埠安全(靜態)步驟 //page 11-27
conf t
int f0/1
switchport mode access
switchport port-security
switchport port-security maximum 1
switchport port-security mac-address 0002.166b.69c8
switchport port-security violation shutdown
查詢 port-security 總表 //page 11-30
en
show port-security
設定介面埠安全(粘滯)步驟 //page 11-31
conf t
int f0/1
switchport mode access
switchport port-security
switchport port-security maximum 2
switchport port-security mac-address sticky //動態學習,需對方使用 ping 才能學到 MAC
switchport port-security mac-address sticky 0001.647c.697e //直接設定
switchport port-security violation restrict
|
||||||||||||||
|
EtherChannel
|
建立通道群組(Port Channel;EtherChannel) //page 12-8
conf t
int range f0/1-2
channel-group 1 mode active (auto, desirable, on, passive)
————–二個 switch 要成對————————
conf t
int range f0/1-2
channel-group 1 mode active (auto, desirable, on, passive)
查詢 EtherChannel 執行狀態 //page 12-9,12-10
en
show etherchannel summary
或
show etherchannel port-channel
修改負載平衡方式 //page 12-11
conf t
port-channel load-blance ?
port-channel load-blance dst-mac
查詢負載平衡狀態 //page 12-11
en
show etherchannel load-balance
在 EtherChannel 執行 Trunk //page 12-15
conf t
int po1
switchport mode trunk
int po2
switchport mode trunk
設定 GW 備援(HSRP 模式)
conf t
int f0/0
standby 10 ip 10.10.10.10
——成對—————
conf t
int f0/0
standby 10 ip 10.10.10.10
指定 HSRP Active Router(設定優先權) //page 12-24
conf t
int f0/0
standby 10 preempt
standby 10 priority 150
查詢 HSRP 狀態綱要 //page 12-25
en
show standby brief
設定 GW 負載平衡(設定二個 HSRP,各自指定一個 Active Router) //page 12-25 12-26
R1#
conf t
int f0/0
standby 10 ip 10.10.10.10
standby 10 preepmt
standby 10 priority 150
syandby 20 ip 10.10.10.20
R2#
conf t
int f0/0
syandby 10 ip 10.10.10.10
—–成對———————-
R2#
conf t
int f0/0
standby 20 ip 10.10.10.20
standby 20 preepmt
standby 20 priority 150
R1#
conf t
int f0/0
syandby 20 ip 10.10.10.20
設定 HSRP 介面追蹤指令 //page 12-28
conf t
int f0/0
standby 10 track s0/0/0 60
//連往外網的線路有問題時,優先權就減60,讓另一部 router 成為 active router
設定 VRRP(PT不支援) //page 12-30
en
show vrrp
show vrrp brief
conf t
vrrp 10 ip 10.10.10.10
vrrp 10 preepmt
vrrp 10 priority 150
設定 GLBP(PT不支援) //page 12-32
en
show glbp
show glbp brief
conf t
int f0/0
glbp 20 ip 10.10.10.20
glbp 20 preepmt
glbp 20 priority 150
|
||||||||||||||
|
STP
|
查詢擴張樹協定(STP;Spanning-Tree Protocol)執行狀況 //page 11-39
en
show spanning-tree
調整 STP BID Priority //page 11-47
conf t
spanning-tree vlan 1 priority 28672 (數值必為4096的倍數)
或
spanning-tree vlan 1 root primary(指定交換器為 ROOT 交換器)
spanning-tree vlan 1 root secondary(指定交換器為備援交換器)
查詢 STP 表 //page 11-51
en
show spanning-tree summary
變更cisco pvst 為 Rapid-pvst //page 11-51
conf t
spanning-tree mode rapid-pvst
查詢 Vlan 的 STP //page 11-53
en
show spanning-tree vlan 10,20
指定 Vlan 的 STP Root 交換器 //page 11-51
conf t
spanning-tree vlan 10 root primary
spannong-tree vlan 20 root primary
指定 Vlan 的 STP 備援交換器 //page 11-58
conf t
spanning-tree vlan 10 root secondary
spannong-tree vlan 20 root secondary
啟動 all port 的 BPDU Guard //11-60
conf t
spanning-tree portfast bpduguard default (PT 不支援)
或
int range f0/1-24
spanning-tree bpduguard enable
停用 STP 功能
conf t
no spanning-tree vlan 1 //page 11-62
啟動 all port 的 PortFast 功能 //page 11-63
conf t
spanning-tree portfast default
spanning-ttee bpduguard enable (通常會搭配啟用 bpduguard)
啟動 port 的 PortFast 功能 //page 11-63
conf t
int f0/5
spanning-tree portfast
spanning-ttee bpduguard enable (通常會搭配啟用 bpduguard)
|
||||||||||||||
|
VTP
|
查詢 VTP 狀態 //page 11-9
en
show vtp status
設定 VTP Client 模式 //page 11-9
conf t
vtp mode client
設定 VTP Transparent 模式 //page 11-10
conf t
vtp mode transparent
設定 VTP Domain
conf t
vtp domain ccna
設定 VTP 密碼
conf t
vtp password cisco
查詢 VTP 密碼
conf t
show vtp password
|
||||||||||||||
|
設定類:
|
設定router網卡 IP:
en
conf t
int e0/0/0 (fa0/0 fa0/1 gig0/0 gig0/1 se0/0/0 se0/0/1…)
ip addr 192.168.10.1 255.255.255.0
no shut //啟動介面卡
clock rate 9600(se0/0/0 或 se0/0/1 時使用)
設定靜態 MAC:
en
conf t
mac-address-table static 0030.F235.350C vlan 1 int fa0/4
exit
設定開機檔
//查看目前開機檔 show version
//查看 flash 可用開機檔 show flash
conf t
boot system falsh c1841-ipbasek9-mz.124-12.bin
end
write(同 copy run start)
reload
備份 run 組態檔到 TFTP
en
copy run tftp:(copy start tftp: , copy flash tftp: , copy run flash: )
輸入 tftp 機器 ip
輸入要備份的檔名
從 TFTP 還原 run 組態檔
en
copy tftp: run
輸入 tftp 機器 ip
輸入要還原的檔名
備份 flash 上的檔案
en
copy flash: tftp:
輸入來源檔名
輸入 tftp 機器 ip
輸入要備份的檔名
從 TFTP 覆製檔案到 flash
en
copy tftp: flash:
輸入 tftp 機器 ip
輸入來源檔名
輸入目的檔名
關閉網路設備的自動埆換網路線功能(auto-MDIX; Medium-Dependent interface Crossover)
en
conf t
int fa0/1
no mdix auto
建立虛擬介面
conf t
int loopback x
ip addr xxx.xxx.xxx.xxx xxx.xxx.xxx.xxx
刪除虛擬介面
conf t
no int loopback x
設定路由器單臂路由(Router on a Stick;Router 對 VLAN) //page 10-38
conf t
int f0/0
no shut
int f0/0.10 //建立子介面10
encapsulation dot1Q 10 //在10的子介面下啟動 802.1Q 的 TRUNK 協定;10代表Vlan 10
ip addr 192.168.10.254 255.255.255.0
int f0/0.20 //建立子介面20
encapsulation dot1Q 20 //在20的子介面下啟動 802.1Q 的 TRUNK 協定;20代表Vlan 20
ip addr 172.30.10.254 255.255.255.0
設定 Switch 單臂路由 //page 10-41
conf t
vlan 10
int valn 10
ip addr 192.168.10.254 255.255.255.0
vlan 20
int vlan 20
ip addr 172.30.10.254 255.255.255.0
exit
ip routing
|
||||||||||||||
|
IPv6:
|
ipv6 IP設定
conf t
int g0/0
ipv6 addr 2001:DB8:1:9::2/64
no shut
Ripng 設定:
ipv6 unicast-routing
ipv6 router rip ccna04
int g0/0
ipv6 rip ccna04 enable
ipv6 EUI-64 設定
conf t
int g0/0
ipv6 addr 2001:DB8:1:9::/64 eui-64
no shut
ipv6 靜態路由設定
conf t
ipv6 route 2001:1:1:1::/64 s0/0/0(或 next hop)
ipv6 預設路由設定
conf t
ipv6 route ::/0 2001:1:1:1::1(或離開介面)
或
ipv6 route ::/0 s0/0/0 2001:1:1:1::1(離開介面 + next hop)
※如果以 link local 為 next hop ,必加離開介面!!
啟動 ipv6 路由協定
conf t
ipv6 unicast-routing //啟動 ipv6 路由協定(繞送功能)
ipv6 router rip ccna04 //啟動 RIPng 程序號碼
exit
int g0/0
ipv6 rip ccna04 enable //在該介面啟動RIPng 程序號碼
查詢 IPv6 NDP Cache 內容
show ipv6 neighbors
刪除 IPv6 NDP Cache 內容
clear ipv6 neighbors
介面啟動 IPv6
conf t
int f0/1
ipv6 enable
啟動 DHCPv6 指令
conf t
ipv6 dhcp pool mypool //設定 IPv6 DHCP 存儲區
dns-server 2001:aaaa::1111 //設定 DNS 位址
int f0/0
ipv6 dhcp server mypool //指定 f0/0 使用 IPv6 DHCP 存儲區
ipv6 nd other-config-flag //DHCP 僅會送出 DNS 資訊,O bit
或————————-
ipv6 nd managed-config-flag //DHCP 負責 IPv6 位址配發,M bit
IPv6 Tunnel轉換機制
conf t
int tunnel 3 //建立 Tunnel 3 介面
ipv6 addr c::1/64 //設定 Tunnel 3 介面IP
tunnel mode ipv6ip //設定 Tunnel 3 使用的模式(IPv6 over IPv4)
tunnel source s0/0/0 //設定 Tunnel 3 的來源
tunnel destination 209.165.200.2 //設定 Tunnel 3 的目的
成對—————————-
int tunnel 2 //建立 Tunnel 2 介面
ipv6 addr c::2/64 //設定 Tunnel 2 介面IP
tunnel mode ipv6ip //設定 Tunnel 2 使用的模式(IPv6 over IPv4)
tunnel source s0/0/1 //設定 Tunnel 2 的來源
tunnel destination 209.165.100.2 //設定 Tunnel 2 的目的
設定 IPv6 Tunnel 路由協定
conf t
ipv6 router rip p100
int tunnel 3 //請注意這裡是 Tunnel 介面,而不是連接 internet 的s0/0/0 介面
ipv6 rip p100 enable
int f0/0
ipv6 rip p100 enable
成對—————————
conf t
ipv6 router rip p100
int tunnel 2 //請注意這裡是 Tunnel 介面,而不是連接 internet 的s0/0/0 介面
ipv6 rip p100 enable
int f0/0
ipv6 rip p100 enable
|
||||||||||||||
|
路由:
|
RIP
|
啟動RIP1
(config)# router rip
(config-router)# network 172.16.1.16
將此路由器的default route 傳出
(config-router)#default-information originate
查看 RIP
#show ip protocols
除錯
#debug ip rip
#undebug all
手動將遠端電腦加入路由表:
conf t
ip route 172.30.0.0 255.255.0.0 fa0/1(介面卡)
或
ip route 172.30.0.0 255.255.0.0 10.0.0.2(next hop ip)
設定預設路由:
conf t
ip route 0.0.0.0 0.0.0.0 10.0.0.2
取消路由設定:
conf t
no ip route 172.30.0.0 255.255.0.0 10.0.0.2
停止fa0/0送出update 訊息(被動介面)
(config)# router rip
(config-if)# passive-interface fa0/0
取消被動介面:
conf t
router rip
no passive-default fa0/0
限制傳送與接收的版本
Router1(config)#interface FastEthernet0/0 (Rip 傳送介面)
Router1(config-if)# ip rip send version <1 | 2 | 1 2>
Router1(config-if)# ip rip receive version <1 | 2 | 1 2>
停止 rip
(config)#no router rip
|
|||||||||||||
|
RIPv2
|
啟動RIP2
R(config)# router rip
R(config-router)#version 2
R(config-router)# network 172.16.1.16
加密傳送
Router1(config)#key chain ORA
Router1(config-keychain)#key 1
Router1(config-keychain-key)#key-string oreilly
Router1(config-keychain-key)#exit
Router1(config)#interface FastEthernet0/0 (Rip 傳送介面)
Router1(config-if)#ip rip authentication key-chain ORA
Router1(config-if)#ip rip authentication mode text(or md5)
Router1(config-if)#exit
Router1(config)#end
手動自動路由壓縮
R3(config)#interface serial0/0/0
R3(config-if)#ip summary-address rip 192.168.0.0 255.255.252.0
關閉自動路由壓縮:
router rip
no auto-summary
使用 ip default-network 宣告預設路由:
conf t
router rip
no network 0.0.0.0
exit
ip default-network 0.0.0.0
清空路由表:
clear ip route * //所有
clear ip route 172.30.100.0
更新路由協定的AD值
router rip
distance AD值
更新靜態路由的AD值
R(config)#ip route 192.168.0.0 255.255.255.0 s0/0 200
單一路由設定:
conf t
router rip
network 0.0.0.0
刪除單一路由設定:
conf t
router rip
no network xxx.xxx.xxx.0
刪除整個 RIP 設定:
conf t
no router rip
|
||||||||||||||
|
OSPF
|
啟動ospf
router ospf 1
network 172.16.1.16 0.0.0.15 area 0
network 172.30.1.0 0.0.0.255 area 0
network 192.168.10.0 0.0.0.3 area 0
查看 ospf
#show ip protocols
#show ip ospf neighbor
#show ip ospf database
#show ip ospf interface serial 0/0/0
用lookback 設定 router ID
(config)#interface lookback 0
(config-if)#ip add 10.1.1.1 255.255.255.255
直接設定router ID
R1(config)#router ospf 1
R1(config-router)#router-id 10.4.4.4
R1#clear ip ospf process
改變ospf priority
Router(config-if)#ip ospf priority
DR and BDR election:
1. compare with each router interface priority
2. compare with each router-id
將此路由器的default route 傳出
(config-router)#default-information originate
重新啟動OSPF
R1# clear ip ospf process
改變Metric值
(config)#interface serial 0/0
(config-if)#bandwidth 64
(config-if)#ip ospf cost 144
一般加密傳送
RTA(config)#router ospf 1
RTA(config-router)#area 0 authentication
RTA(config-router)#exit
RTA(config)#int s0/1/0
RTA(config-if)#ip ospf authentication-key cisco (cisco:passwd)
Md5加密傳送
RTA(config)#router ospf 1
RTA(config-router)#area 0 authentication message-digest
RTA(config-router)#exit
RTA(config)#int s0/1/0
RTA(config-if)#ip ospf message-digest-key 10 md5 cisco
清除 MD5
conf t
int s0/0/0
no ip ospf message-digest-key 1
設定 OSPF 預設路由
conf t
ip route 0.0.0.0 0.0.0.0 loopback0(離開介面|IP)
router ospf 30
default-information originate
修改 hello 時間
conf t
int fa0/1
ip ospf dead-interval 20
ip ospf hello-interval 5
修改 OSPF 頻寬
conf t
int f0/0
bandwidth 1000000
router ospf 10
auto-cost refence-bandwidth 1000
|
||||||||||||||
|
OSPFv3
|
設定 OSPFv3
conf t
ipv6 unicast-routing
ipv6 router ospf 100
router-id 1.1.1.1
int f0/0
ipv6 ospf 100 area 0
int s0/0/0
ipv6 ospf 100 area 0
重啟 OSPFv3
conf t
clear ipv6 ospf process
設定 link-local
conf t
int g0/0
ipv6 addr fe80::1 link-local
|
||||||||||||||
|
EIGRP
|
啟動EIGRP
R1(config)#router eigrp 1 //(AS 編號,1-65535)
R1(config-router)# network 192.168.10.4 0.0.0.3(wildcard)
R1(config-router)# network 192.168.11.1 0.0.0.0(只有這個界面參予eigrp)
取消 EIGRP 預設路由
conf t
router eigrp 10
no redistribute static
查詢目前正在運作的 EIGRP 介面
en
show ip eigrp int
設定 EIGRP 預設路由
conf t
ip route 0.0.0.0 0.0.0.0 s0/0/0
使用 ip default-network 設定預設路由
conf t
ip route 192.168.20.0 255.255.255.0 fa0/0
ip defalut-network 192.168.20.0 //設定預設路由
router eigrp 10
network192.168.20.0 //宣告預設路由
傳送 EIGRP 預設路由
conf t
router eigrp 10
redistribute static
查詢 EIGRP 鄰居
en
show ip eigrp neighbors
設定頻寬
R3(config)#interface serial0/0/1
R1(config-if)#bandwidth 1024
設定傳送佔用頻寬比
Router1(config)#interface Serial0.1
Router1(config-subif)#ip bandwidth-percent eigrp 55 40 (最高使用40%)
修改 hello 的傳送時間
Router1(config)#interface Serial0.1
Router1(config-subif)#ip hello-interval eigrp 55 3
Router1(config-subif)#ip hold-time eigrp 55 9
Add loopback addresses
R3(config)#interface loopback1
R3(config-if)#ip address 192.168.2.1 255.255.255.0
將此路由器的default route 傳出
Redistribute static or ip default-network
EIGRP 不支援default-information originate
手動 summarization
R3(config)#interface serial0/0/0
R3(config-if)#ip summary-address eigrp 1 192.168.0.0 255.255.252.0
關閉自動summarization
R1(config)#router eigrp 1
R1(config-router)#no auto-summary
修改 EIGRP 的 AD 值
conf t
router eigrp
distance eigrp 80(內部AD值) 170(外部AD值)
設定為末端路由
R1(config-router)# eigrp stub
router# show ip eigrp neighbor detail
過濾從Serial0/0進來的路由資訊
Router2(config)#access-list 34 deny 192.168.30.0
Router2(config)#access-list 34 permit any
Router2(config)#router eigrp 55
Router2(config-router)#distribute-list 34 in Serial0/0
修改 EIGRP Variance 值
conf t
router eigrp 10
variance 2
設定 EIGRPv6
conf t
ipv6 router eigrp 10
eigrp router-id 1.1.1.1
no shut
int f0/0
ipv6 eigrp 10
int s0/0/0
ipv6 eigrp 10
|
||||||||||||||
|
WAN
|
ACL
|
設定標準 ACL //page 15-7
conf t
access-list 10 permit host 192.168.10.1
access-list 10 deny host 192.168.10.2
int f0/1
ip access-group 10 out //在 f0/1 啟動編號 10 ACL 檢查「出去」封包
查詢 ACL 清單 //page 15-7
en
show access-list
或
show run
查詢介面啟動 ACL //page 15-8
en
show ip int f0/1
重設 ACL 執行計數器 //page 15-11
en
clear access-list counters
設定延伸 ACL //page 15-14
conf t
access-list 100 permit ip host 192.168.10.1 any
access-list 100 permit ip host 192.168.10.2 host 207.16.10.1
access-list 100 deny ip host 192.168.10.2 host 207.16.10.10
int f0/1
ip access-group 100 out
設定命名式延伸 ACL //page 15-18
conf t
ip access-list extended R1-ACL //命名 ACL 為 R1-ACL
permit tcp host 192.168.10.1 any eq www //允許 192.168.10.1 的 http 封包通過
permit tcp host 192.168.10.2 ant eq ftp //允許 192.168.10.2 的 ftp 封包通過
deny ip any any //全部拒絕,不下這條系統也會自動執行,但不會出現在 show access-list 中
int f0/0
ip access-group R1-ACL in
檢查 Source Port 的ACL //page 15-22
conf t
access-list 100 permit tcp host 207.16.10.1 eq 80 any //檢查來源 Port 的ACL
access-list 100 deny ip any any
int f0/1
ip access-group 100 in
進階 ACL 設定(只讓PC-C連接 HTTP,其它流量無限制) //page 15-25
conf t
access-list 100 permit tcp host 192.168.33.3 host 172.22.242.23 eq 80
access-list 100 deny tcp any host 172.22.242.23 eq 80
access-list 100 permit ip any any
int f0/0
access-group 100 out
簡易防火牆設定 //page 15-29
conf t
ip access-list extended TCPIN //命名 access-list
permit tcp any any established //只允許內網連出-外網回應的封包
deny ip any any
exit
ip access-list extended TCPOUT
permit tcp 192.168.10.0 0.0.0.255 any eq www //只允許 192.168.10.0/24 使用 http
permit tcp 192.168.30.0 0.0.0.255 any eq ftp //只允許 192.168.30.0/24 使用 ftp
deny ip any any
exit
int s0/10
ip access-group TCPIN in
ip access-group TCPOUT in
模擬 ISP 設定 ACL 阻擋私有 IP 連外網 //page 15-35
conf t
access-list 10 deny 10.0.0.0 0.255.255.255 //阻擋 10.0.0.0 連外網
access-list 10 deny 172.16.0.0 0.15.255.255 //阻擋 172.16.0.0 ~ 172.31.0.0 連外網
access-list 10 deny 192.168.0.0 0.0.255.255 //阻擋 192.168.0.0 連外網
access-list 10 permit any
int s0/0/1
ip access-group 10 in
※172.16.0.0/255.240.0.0 = 172.16.0.0 ~ 172.31.0.0
※萬用遮罩位元 = 0:代表「要」檢查對應位元的值;0 代表要完全比對
※萬用遮罩位元 = 1:代表「不」檢查對應位元的值;255 代表完全不用比對
測試 ACL 檢查奇數或偶數網路 //page 15-39
conf t
access-list 10 permit 172.10.0.0 0.0.254.255 //偶數子網路允許通過
access-list 10 deny 172.10.1.0 0.0.254.255 //奇數子網路不允許通過
access-list 10 permit any //都允許通過
int s0/0/1
ip access-group 10 in
※奇、偶子網判斷:以 172.10.0.0 為例,檢查第3個十進位是奇數還是偶數
※為奇數時,第24位元的二進位必為1;為偶數時,第24位元的二進位必為0
※因此只要檢查第24位元即可 => 00000000.00000000.11111110.11111111 => 0.0.254.255
vty 啟動 ACL //page 15-41
conf t
access-list 10 permit host 10.10.10.1
access-list 10 deny any
line 0 4
password ccna
login
access-class 10 in //在 VTY 介面中啟動編號 10 的 ACL
在 IPV6 啟動 ACL //page 15-45 ~ 15-48
conf t
ipv6 access-list prefixacl //ipv6 只能用命名方式
deny ipv6 2001:aaaa::/64 host 2001:cccc::2
permit ipv6 any any
int f0/0
ipv6 traffic-filter prefixacl in //啟動 prefixacl 的 ACL
—–
conf t
ipv6 access-list httpacl
permit tcp host 2001:bbbb::2 host 2001:cccc::2 eq www
deny tcp any host 2001:cccc::2 eq www
permit ipv6 any any
int f0/1
ipv6 traffic-filter httpacl in
—–
conf t
ipv6 access-list vtyacl
permit ipv6 host 2001:bbbb::3 any
deny ipv6 any any
line vty 0 4
ipv6 access-class vtyacl in
line vty 0 4
password ccna
login
|
|||||||||||||
|
DHCP
|
設定 DHCP RELAY //page 16-44
conf t
int f0/1
ip helper-address 192.168.10.1
設定 DPHCP SERVER //page 16-46
conf t
ip dhcp pool LAN10
network 192.168.10.0 255.255.255.0
default-router 192.168.10.1
dns-sever 100.100.100.1
exit
ip dhcp pool LAN20
network 192.168.20.0 255.255.255.0
default-router 192.168.20.1
dns-server 100.100.100.1
設定 DPHCP SERVER 保留範圍 //page 16-46
conf t
ip dhcp excluded-address 192.168.10.1 //設定保留單一 IP
ip dhcp excluded-address 192.168.20.1 192.168.20.9 //設定保留範圍
查看 DHCP IP 分配狀況 //page 16-47
en
show ip dhcp binding
查看 DHCP Pool 使用狀況 //page 16-49 PT 模擬器不支援
en
show ip dhsp pool
查看 DHCP IP 衝突狀況 //page 16-49 PT 模擬器不支援
en
show ip dhsp conflict
|
||||||||||||||
|
NAT
|
查看 NAT TABLE //page 16-5
en
show ip nat translations
NAT 內部靜態轉址對應 //page 16-8
cont f
ip nat inside source static 192.168.10.254 200.200.200.1 //與外部轉址顛倒
int f0/0
ip nat inside
int s0/1/0
ip nat outside
NAT 外部靜態轉址對應 //page 16-13
cont f
ip nat outside source static 200.200.200.1 150.150.150.1 //與內部轉址顛倒;150.150.150.1 實體可不存在
int f0/0
ip nat inside
int s0/1/0
ip nat outside
強制消取 NAT TABLE 中PING 序號對應 //page 16-14
en
clear ip nat translation *
設定 NAT 動態轉址對應 //page 16-16
conf t
ip nat pool R1NAT 200.200.200.1 200.200.200.2 netmask 255.255.255.0 //設定二個 Global IP 到 R1NAT 的儲存區
access-list 1 permit 192.168.10.0 0.0.0.255 //設定 只有 192.168.10.0/24 可以上網
access-list 1 deny any
ip nat inside source list 1 pool R1NAT //設定 access-list 1 使用 R1NAT 的儲存區
int s0/0/0
ip nat inside
int s0/1/0
ip nat outside
查詢 NAT 動態轉址統計內容 //page 16-18
en
show ip nat statistics
查詢 NAT DEBUG 訊息 //page 16-23
en
debug ip nat
設定 PAT(Port Address Translations) //page 16-26
conf t
ip nat pool R1NAT 200.200.200.1 200.200.200.1 netmask 255.255.255.0
access-list 1 permit 192.168.10.0 0.0.0.255
access-list 1 deny any
ip nat inside source list 1 pool R1NAT overload
int s0/0/0
ip nat inside
int s0/1/0
ip nat outside
使用 NAT Outside 介面轉址 //page 16-29
conf t
access-list 1 permit 192.168.10.0 0.0.0.255
access-list 1 deny any
ip nat inside source list 1 interface s0/1/0 overload //使用 s0/1/0 的 IP 當作 global IP
int s0/1/0
ip nat outside
int f0/0
ip nat inside
|
||||||||||||||
|
PPP
|
查詢那個序列埠是 DCE //page 13-7
en
show controllers s0/00
設定序列埠時脈 //page 13-8
conf t
int s0/0/0
clock rate 64000
設定 WAN 序列埠為 PPP //page 13-14
conf t
int s0/0/0
encapsulation ppp
設定 WAN PPP 中 PAP 單向認証 //page 13-16
R1#
conf t
username cisco password ccna 建立使用者帳密
int s0/0/0
encapsultaion ppp 設定L2協定為PPP
ppp authentication pap 啟動 PAP 認証功能
———-成對——————–
R2#
conf t
int s0/0/0
encapsultaion ppp 設定L2協定為PPP
ppp pap sent-username cisco password ccna 送出 PAP 認証的使用者名稱及密碼
設定 WAN PPP 中 PAP 雙向認証 //page 13-19
R1#
conf t
username cisco password ccna 建立使用者帳密
int s0/0/0
encapsultaion ppp 設定L2協定為PPP
ppp authentication pap 啟動 PAP 認証功能
ppp pap sent-username cisco1 password ccna1 送出 PAP 認証的使用者名稱及密碼
———-成對——————–
R2#
conf t
int s0/0/0
encapsultaion ppp 設定L2協定為PPP
ppp authentication pap 啟動 PAP 認証功能
ppp pap sent-username cisco password ccna 送出 PAP 認証的使用者名稱及密碼
設定 WAN PPP 中 CHAP 認証 //page 13-23
R1#
conf t
username R2 password cisco 建立使用者帳密(帳號固定為對方機器名稱;密碼二者要相同)
int s0/0/0
encapsultaion ppp 設定L2協定為PPP
ppp authentication chap 啟動 CHAP 認証功能
———-成對——————–
R2#
conf t
username R1 password cisco 建立使用者帳密
int s0/0/0
encapsultaion ppp 設定L2協定為PPP
—————————————————
ppp authentication chap 啟動 CHAP 認証功能 加上這條指令就變雙向認証
混合啟動 PPP 認証 //page 13-24
conf t
int s0/0/0
encapsulation ppp
ppp authentication pap chap
或
ppp authentication chap pap
|
||||||||||||||
|
Other
|
查詢路由器時間 //page 17-3
en
show clock
設定與 NTP SERVER 同步 //page 17-3
conf t
ntp server 200.200.200.1
設定路由器為 NTP SERVER //page 17-3 PT 模擬器不支援
conf t
ntp master
查詢 NTP 狀態 //page 17-3
en
show ntp status
查看 LOG 啟動狀態 //page 17-6
en
show logging
關閉與啟動 LOG 的指令 //page 17-7
conf t
logging console //啟動 console logging
no logging console //關閉 console logging
logging monitor //啟動 VTY logging
no logging monitor //關閉 VTY logging
logging buffered //啟動記憶體緩衝區 logging
no logging buffered //關閉記憶體緩衝區 logging
logging host 192.168.10.10 //啟動 log Server
logging trap debugging //指定要記錄 IOS 訊息的等級–debugging 代表7以下均要記錄(0-7)
service timestamps log datetime msec //將 IOS 訊息標記時間
service sequence-numbers //將 IOS 訊息標記序號
Netflow 流量分析工具 //page 17-10 ~ 17-17 PT 模擬器不支援
conf t
int s0/0/0
ip flow ingress //啟動 netflow 捕捉進來 s0/0/0 的流量
ip flow egress //啟動 netflow 捕捉出去 s0/0/0 的流量
exit
ip flow-export destination 10.10.10.10 9996 //設定 Netflow 伺服器 IP 及 Port
ip flow-export version 9 //設定 Netflow;共有 1, 5 ,9 三個版本
show ip flow int //查詢 Netflow 的啟動介面
show ip flow export //查詢 Netflow 伺服器設定及傳送流量相關狀態
show ip cache flow //查詢 Netflow 捕捉到的流量資訊摘要
clear ip flow status //清除路由器中的 Netflow cache
設定 SNMP Agent //page 17-21
conf t
snmp-sever community ccna ro //設定 SNMP 唯讀密碼 ccna
snmp-sever community cisco rw //設定 SNMP 可讀寫密碼 cisco
snmp-sever location SJU //設定 SNMP Agent 所在地
snmp-sever contact 022081-3131 //設定 SNMP Agent 連絡資訊
|
||||||||||||||
剛剛看了個蘋果的新聞
日本網友弄個七龍珠照要去找工作
我這幾天也在面試人
搞這種 Cosplay 照片要去找工作
真是太有材了
其實你被刷掉的原因不是因為弄個奇怪照
而是因為你是個 男的…. 哈哈哈
以下是新聞連接… Url
URL: 我是賽雅人
主機板: ASUS Z270H
SSD: Intel 600P 128G/M.2 PCIe 2280/讀:770M/寫:450M/TLC顆粒/五年, $1990
因為要挖礦所以買了個沒裝過的 插卡式 SSD
 (長這樣)
(長這樣)
本想要用 ASUS 還原光碟直接還原
結果發現不行
Win7 , Win8.1 , Win10 都不能還原
因為少了 NVMe support driver
有一種 你娘卡好的FU
但是用一般的 SATA HDD 試裝卻沒問題
所以只好很認真的在地上爬…
還找了 Intel 600P 的原廠文…
就是說 請加 Driver Driver Driver…..
以下只大致流程
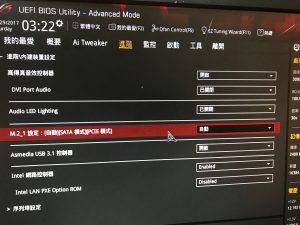
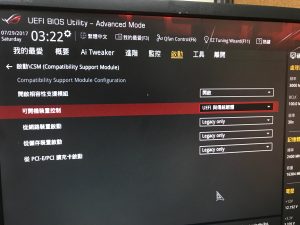
1. BIOS 先注意一下設定: CSM(Compatibility Support Module) ,
有人寫要選 PCI-E/PCI 擴充卡啟動: UEFI 優先… (但我沒有選)
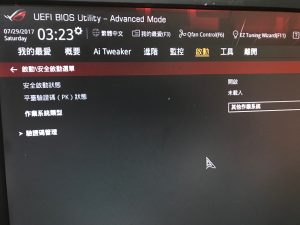
以下把一些相關的拍下來留存
2. 找 技嘉的 Win7 USB 封裝工具(mb_utility_windows_image_tool),
因為這個工具會連 USB 3.0 及 NVMe Driver 一起包進去,
記得 USB 會被清空, 最小要有 8G.
3. 準備工具: Win7 SP1 ISO , 8G 隨身碟
4. 執行 嘉的 Win7 USB 封裝工具 , 三個打勾都選, 跑完後這個USB就可以開機裝
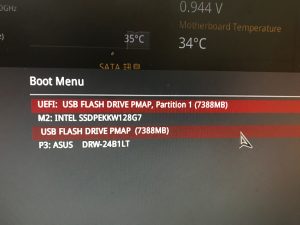
5. 開機時選 USB Flash driver xxxx… 選錯就要重來了, 我就是.. 不過裝機超快約十分鐘
(因為我要裝成 MBR 磁碟格式, 因為我的 win7 loader 只能在這模式下跑)
如你的 HDD大於 2T 要選 UEFI: USB Flash xxxx (會裝成 GPT 磁碟格式)
6. 裝完更新後上 Win10
ASUS Z270H
目前接三顯卡在挖礦
以 CPU在右卡槽在左
0: Radeon RX 560 AERO 4G OC
1: 2: 華碩 RX560-O2G (兩張都是 ASUS)
算力約: 0: 10 1: 5 2: 1 Total: 約 16Mh/S
本以為是顯卡的問題
兩張 ASUS AMD RX-560 調換 一樣
一樣是 抓不到 MSI RX-560
個人覺得是 兩家 廠商 不合….. 這應該才是重點
原先 MSI 那張插在 2: 位置…. 抓不到
只能插在 0: ( CUP這邊)
結論就是 買同廠牌好一點
至少 要吵的時候 他們才不會說 ……. 誒
誒
誒
因為別人家的不相容 請找別家處理
只有說 算你雖拉.
這兩天在上傳個 VM 到 Google空間
每個檔約4G
然後從晚上跑到天亮
好久沒測我的 ADSL 速度
下載約 8MB 上傳約 2.5MB
但是我的帳單是 20/5MB
有種 CHT 騙很大的感覺…
然後再測我的手機
我勒手機的 4G 比我的 ADSL快…
我一直以為我的 ADSL 不慢說